A Garmin watch screenshot by itself can look like a tiny isolated UI crop. It shows the interface, but viewers may not immediately understand the device context, screen shape, or how the app looks on a real watch.
Adding a Garmin watch frame solves that problem. A frame gives the screenshot physical context, makes the screen easier to understand, and helps the image work in Connect IQ listings, product pages, documentation, and launch posts.
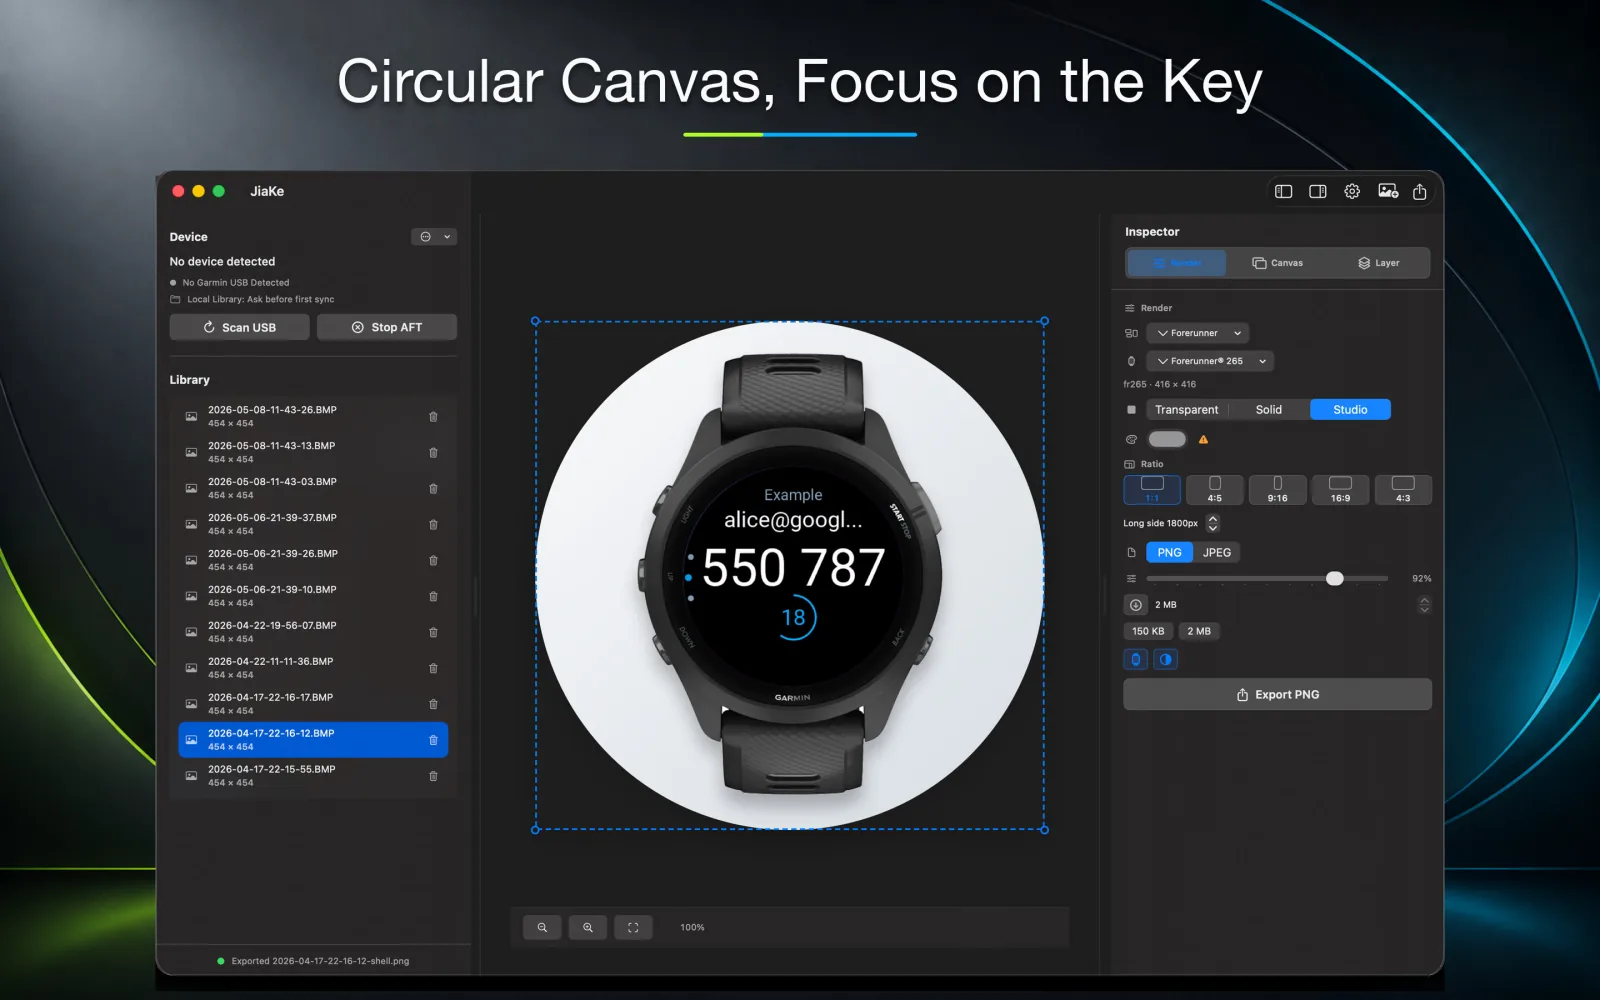
The key is restraint. The frame should clarify the screenshot, not hide it. Clean device context, accurate screen masking, balanced spacing, and a simple background usually work better than heavy decoration.
Quick answer
To add a Garmin watch frame to a screenshot:
- Copy the real screenshot from the watch, usually from
GARMIN\ScreenShot. - Keep the original BMP as the source file.
- Choose a frame that matches the screenshot shape: round, square, or rectangular.
- Mask the screenshot to the correct screen opening.
- Place the screenshot behind the frame layer.
- Align the screen edges precisely.
- Export a PNG or JPEG at the size required by the destination.
You can do this manually in a design tool, or use JiaKe.app to handle Garmin screenshot frames, presets, previews, and exports in a local Mac workflow.
Why manual framing takes time
After you retrieve the BMP screenshot from the watch, a design tool still needs a frame asset. That means searching through old files, downloading or rebuilding a frame, cleaning up the frame layer, and making sure the screen opening matches the screenshot shape.
Then comes the precision work. Round screens need a circular crop. Square and rectangular screens need their own masks. The screenshot has to sit behind the frame, not above it, and a tiny alignment mismatch becomes visible once the final PNG is used in a product page.
- Find or prepare a watch frame asset.
- Crop the screenshot into the screen shape.
- Place the screenshot at the correct layer depth.
- Drag, scale, and align until the frame looks believable.
- Export and compress the final image for the target destination.
For one screenshot, this is manageable. For a full release set, the repeated work adds up.
Choose the right frame for the screen
Start by matching the screenshot to the device shape. A round watch face needs a round frame. A square device screenshot should keep a square screen. A rectangular screenshot should keep its real proportions.
For product marketing, accuracy matters. Developers and users recognize device families, and a mismatch can make a Connect IQ app screenshot feel less trustworthy.
| Source screenshot | Frame choice |
|---|---|
| Round watch face | Round watch frame with circular screen mask |
| Square watch screenshot | Square device frame with straight edges |
| Rectangular screen | Rectangular frame or neutral device context |
| Mixed device support | Separate presets by screen shape |
Do not use a round frame only because it looks better. If the app supports a square device and the screenshot came from that screen, keep the shape honest.
Avoid stretched or distorted screenshots
The most common framing mistake is stretching the screenshot to fit a frame that does not match. This creates oval watches, squashed UI, blurry text, and misleading app previews.
Use these checks:
- The watch screen should keep its original aspect ratio.
- Circular screens should remain circular.
- Text and icons should not look wider or taller than the source.
- The frame should not cover important UI.
- The final image should remain readable at listing-preview size.
If the frame and screenshot do not match, choose a different frame instead of forcing the screenshot into place.
Keep the screen readable
After the screenshot is inside the frame, zoom out and check readability. Garmin screens can include small data fields, icons, labels, and complications. If those details vanish in the final export, the mockup is not doing its job.
A useful frame creates context while preserving the real screen content.
- Avoid over-scaling the frame when the screen contains dense data.
- Use enough padding so the watch does not touch the canvas edge.
- Prefer solid or quiet backgrounds for technical screenshots.
- Export a second size if the same image will be used in a small preview.
For watch faces, complications and time text need to stay crisp. For data fields, the numbers must be readable. For widgets and apps, the primary state should be obvious without a long caption.
Use a consistent layout system
If you are preparing several screenshots, decide the rules once: frame size, background, alignment, text placement, and export dimensions. Then apply those rules across the set.
This is where manual design-tool work can become slow. A tiny alignment change in one screenshot can create a visual mismatch across the whole release, and fixing that mismatch means going back through masks, layers, positions, and export settings.
Use a simple system:
| Rule | Why it matters |
|---|---|
| Same frame scale | Prevents the set from feeling uneven |
| Same background family | Keeps the product, not the decoration, in focus |
| Same screen alignment | Avoids visible jumps between images |
| Same export dimensions | Makes listing and documentation pages cleaner |
| Same compression target | Prevents some images from looking sharper than others |
The visual system should make the product easier to scan. It should not compete with the actual Garmin screen.
Frame types: realistic, simplified, and neutral
Not every screenshot needs the same style of frame.
Realistic frames work well when you want a finished product image. They help users imagine the app on an actual device.
Simplified frames work well for documentation and developer posts. They add context without turning the page into marketing material.
Neutral frames work well when the exact device does not matter, or when the app supports many device families and you want to focus on the interface.
Choose the frame style based on the destination, not personal taste.
Export sizes for framed Garmin screenshots
A framed screenshot can be exported several ways:
| Export | Good for |
|---|---|
| Square PNG | Store cover images, product cards, social posts |
| Wide PNG or JPEG | Hero images, website sections, launch announcements |
| Plain framed PNG | Documentation and support pages |
| Long canvas | Release notes, comparison pages, feature walkthroughs |
| Small compressed PNG | Store screen images with tight file-size limits |
If the image is for the Connect IQ Store, check the current upload form before final export. Garmin's public brand guidance lists a 1440 x 720 hero image size, while current developer discussions still mention tight limits for cover and screen images.
Frame screenshots locally with JiaKe
JiaKe.app keeps the framing step local on macOS. Connect the watch, copy or import the screenshots, select an image, choose a watch frame and preset style, preview the layout, and export a clean PNG or JPEG.
You still control the final image. JiaKe.app simply removes the repetitive setup around Garmin device frames: searching for frame files, cutting screen masks, arranging layers, dragging into place, and checking the same export settings again.
For a broader workflow, see Garmin BMP to PNG, Garmin watch screenshot, and Connect IQ screenshot size guide.
The value is speed plus consistency
A single manual frame may only cost a few minutes. A set of product images can cost much more because every screenshot repeats the same steps. If you maintain several Connect IQ apps or update screenshots often, that repeated work becomes expensive.
Using a dedicated frame workflow saves time per image and keeps the output consistent. The first benefit is faster production. The second benefit is fewer visual mistakes across the full screenshot set.
That consistency is especially important for:
- Connect IQ app listings.
- Watch face launch images.
- Widget and data field documentation.
- Product pages.
- App update posts.
- Support screenshots.
Common mistakes
Using the wrong shape
Do not force a square screenshot into a round frame or a round screenshot into a square layout. The image may look designed, but it will feel inaccurate.
Making the frame too decorative
The frame should support the screenshot. Avoid heavy shadows, busy backgrounds, or large text that pulls attention away from the actual Garmin UI.
Exporting only one size
The same framed screenshot may need a square cover, a wide hero image, and a smaller documentation version. Keep the source and export multiple variants.
Forgetting the file-size limit
Framed images can become larger than raw screenshots. Check file size before upload, especially for Connect IQ screen images.
FAQ
Why add a watch frame to a Garmin screenshot?
A watch frame gives the screenshot product context and makes it look more finished for listings, websites, documentation, and launch posts.
Should the frame match the exact Garmin device?
Use the closest accurate shape and presentation style available. Matching the screen shape is especially important for watch faces and interface-heavy screens.
Can I add a frame to a Garmin BMP screenshot?
Yes. Copy the BMP file from the watch, keep it as the source, then place it into a matching frame and export the final image as PNG or JPEG.
What format should framed Garmin screenshots use?
Use PNG for UI-heavy screenshots and JPEG for larger marketing compositions where file size matters more than exact UI pixels.
Can JiaKe export framed Garmin screenshots as PNG files?
Yes. JiaKe.app imports Garmin screenshots, applies a device frame, and exports PNG or JPEG images for release assets.